Scheduling Calendar User Guide
The following topics are covered in this article:
- Access Scheduling Calendar
- Calendar Header
- Staff Column
- Temporary Filters
- Sticky Filters
- Help Key
- Office View
- Drag and Drop Scheduling
- Add Tasks and Notes
The Scheduling Calendar is used to create, adjust and review employee schedules via drag and drop tasks that have been autogenerated by Task Rules. Visual scheduling aids include color-coding of regions, alerts for new bookings, same-day turnovers, time estimates for tasks, property notes, employee days off, and more. The Scheduling Calendar enables businesses to quickly create workload-balanced staff schedules with route optimization.
Scheduling Calendar Features
Scheduling Calendar Header

The scheduling calendar header has three features to orient and maximize scheduling efficiency; The full-screen button removes the Filter Box from the screen to give you more screen space to schedule. The date range in bold to keep you oriented. The Calendar Navigation Bar to help you easily change the date range viewed on the scheduling calendar.
In Day View, you can sort tasks within that day. They may already be auto-sorted if you have set up sort orders. Set up sort orders first by the Region Sort Order (set up in Regions) then by the Property Sort Order (set up in Properties).
Staff Column
Below the Calendar Header is the Drag and Drop Scheduling Calendar. The left column is comprised of the people who service the properties. Staff can be employees or vendors or subcontractors. The column name "Staff" is used for simplicity. The Staff column includes Staff name, a link to their mobile Dashboard (db) and their Department (housekeeping, maintenance etc.).

To modify the Staff Column width
- Hover the mouse over the line between two columns. The cursor will turn into a double arrow.
-
Click and drag the column border-left/right to decrease/increase column width.


To view Staff Dashboard
- Click the db icon in the Employee Column. This will show you the employee dashboard in the large-screen format.
- Right-click --> Inspect to view the dashboard in mobile device format.
Filter Box
The Filter Box is utilized to help you see the data you need and hide the rest. Temporary and sticky filters customize your scheduling calendar search results so you can find and schedule exactly what/who/when you want.

Temporary Filters
Filter and review specific properties, regions, tasks or employees. Once a category review is complete the Clear button will clear the category filter.
Sticky Filters
Sticky Filters sort the bookings and task data and "sticks" the filter across multiple calendars. Sticky Filters are a powerful scheduling tool to help you optimize workloads, routes, and workflow.
-
Check/Uncheck the Show Time Window Sticky Filter and then -->Set/Return Key to see the window of time available for a task to be completed in the task box/in a box attached to the cursor.


-
Check/Uncheck the Hide Alert Colors filter -->Set/Return Key so new bookings will not/will appear in yellow

-
Check the Day filter -->Set/Return Key to view the daily sum of hours estimated to complete tasks. The Day filter shows two totals: the first, based on the sticky filter area (Sticky Filter Total), and the second, based on the sum of task time estimates in the day regardless of any filters applied (Totals). The totals will appear at the bottom of the scheduling calendar.

-
Check the Range filter --> Set/Return Key to view the total time estimates for a given employee for the range of time

-
Check the Total filter -->Set/Return Key to view the estimated time assigned to an employee on a given day.

- Check the Mse Clk Off --> Set/Return Key to desensitize the mouse when you are using the drag and drop feature.
-
Check the Multi Drag filter --> Set/Return Key to check and drag multiple task boxes simultaneously.


Department, Staff Tags, Region Groups, Regions Filters
Group Filters search and isolate bookings and/or task data based on pre-assigned groups.
The Staff, Back to Back (B2BM) and View Filter
The Staff Filter enables managers to build and review employee daily, weekly or monthly schedules in isolation.
Within Staff Filter Scheduled On Selected Date allows managers to view only the staff members that are not set to be off on the date selected in the Date filter

The Back to Back (B2B) Filter allows managers to view and schedule all Back to Back changeovers first.
The Date Filter enables you to move back and forth between calendars and work on a specific starting date.
Help Key
The Scheduling Calendar uses color-coding to identifying top priorities and uses icons to visually show work status and/or important notes. The Help Key explains what the colors and icons used on the Scheduling Calendar mean.

Access Help Key
The Help Key is located in the upper left-hand corner of the filter box.
Click the words Help Key and the Help Key Box appears.

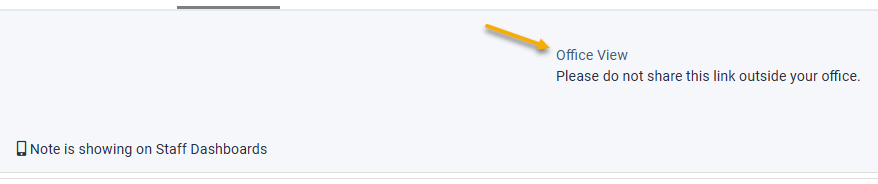
Office View
The Office View feature is located in the Filter Box Help Key area. This is a link to a non-editable scheduling calendar. You can use this link to set up a tablet screen in your laundry room or anywhere else your staff needs to view the task calendar in this way.

Drag and Drop Scheduling
-
Single click on Tasks in the Scheduling Calendar. Drag and Drop the task between dates and employees.
Note: The calendar will not let you drop a task outside a task window. If you drag a "team task" it will move both task boxes. - Click on a Task to view and change the task detail. In the Task Detail Pop-Up Window tasks can be made inactive, completed for the employee, renamed, reassigned to employees, notes added, billable amounts corrected and more.
Add Tasks and Notes
Add notes, One Time Tasks (new One-Off task), and/or Standard Tasks (choose from already created Task Rules) to the Scheduling Calendar. This feature allows you to easily update and review your working calendar without leaving the Scheduling Calendar page.
- On the Scheduling Calendar page click the Actions button in the upper right-hand corner of the page.
- On the button drop-down menu click on +Add One-Off Task, +Add Standard Task, +Add Multiple Standard Tasks, Add Calendar or View All Notes.